Salt Chlorinator Troubleshooting: Why Your Salt Cell is Not Producing Chlorine
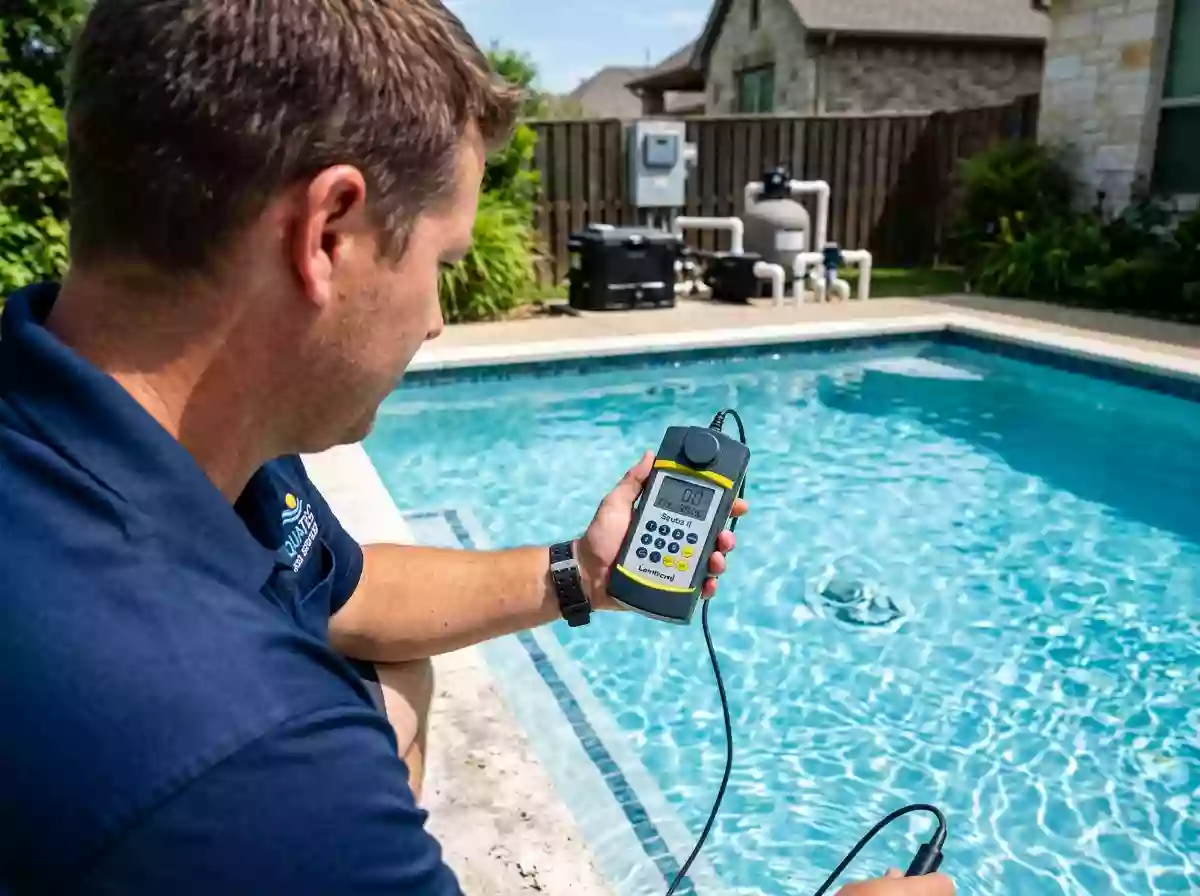
You follow your standard maintenance routine, running the salt cell to sanitize the pool. Suddenly, despite completing the cycle, the water remains cloudy and lacks that faint, clean chlorine odor. You check the control panel—no error codes. You test the water, and the free chlorine reads zero. Your immediate reaction might be that the salt cell has failed or reached the end of its lifespan. But before you rush to buy a replacement, pause. A salt cell not producing chlorine doesn’t always mean the hardware is dead. You must first rule out other underlying causes. Below is a professional salt chlorinator troubleshooting guide to help you find the real issue.
Top Reasons Why Your Salt Cell Is Not Producing Chlorine
Step 1: Rule Out Water Chemistry and “Chlorine Demand”
The salt cell might be operating perfectly, yet you still face a scenario where the pool salt level correct but no chlorine registers on your test kit. The first step is to thoroughly test pool water chemistry, focusing on temperature, organics, and cyanuric acid (CYA).
- Water Temperature Too Low: Check your pool’s water temperature. Many systems automatically shut down when the water drops below 50–60°F (10–15°C) due to low electrical conductivity, a built-in mechanism to protect the ruthenium iridium coating. If the cell is offline, you will not detect free chlorine.
- High Phosphates / Organic Load: If you recently experienced days of continuous rain (leading to an algae bloom) or hosted a pool party with many swimmers, the organic and phosphate levels have likely spiked. This creates a massive “chlorine demand” that exceeds the salt chlorinator’s standard output. Running the system for your usual duration is simply no longer sufficient.
- Cyanuric Acid (CYA) Levels: Perhaps you drained and refilled part of the pool but forgot to add CYA, or heavy rainfall diluted the existing CYA. CYA acts as a “sunscreen” for chlorine. If CYA levels are critically low, UV rays from the sun will rapidly degrade the free chlorine before your test kit can even measure it.
Step 2: Flow Switch Errors and Sensor Interlocks
Step 2 involves inspecting the salt cell flow switch and pump speed. Most control panels are programmed to disable the salt cell if there is insufficient water flow. During operation, electrolysis produces hydrogen gas. If the water isn’t moving to carry this gas away, it accumulates—and concentrated hydrogen is highly explosive. Therefore, a damaged flow switch that fails to open will prevent the cell from working. Additionally, verify your pool pump’s operation. If you are using a variable speed pump (VSP) running at an excessively low RPM, the flow rate may not be strong enough to trigger the flow switch.
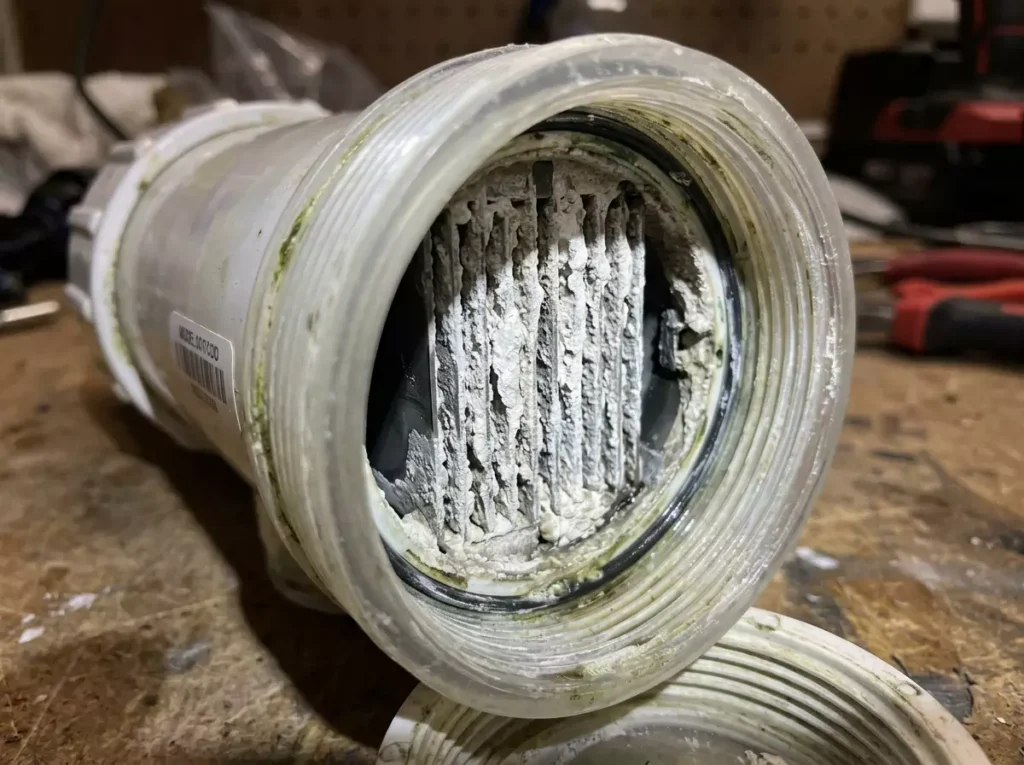
Step 3: Calcium Scaling (The Insulating Barrier)
Even if your water flow is optimal, calcium carbonate scaling on the titanium plates can act as a severe electrical insulator. During electrolysis, the cathode generates heat, which draws calcium out of the solution and deposits it directly onto the plates. This barrier blocks the electrical current, effectively stopping chlorine production.
If your cell features a clear housing, you can inspect it visually; if the housing is opaque, you must disassemble the unit to check. If you discover heavy scaling, you must clean a salt cell using a proper muriatic acid pool wash, strictly following the manufacturer’s instructions. Crucial warning: Never use metal tools to scrape the scale off for convenience. Doing so will permanently damage the MMO coating.
Step 4: The Ultimate Field Diagnostic: The Bucket Smell Test
Whether your control panel shows an error or not, once you have completed the acid wash, this test is mandatory. It is the most direct way to answer how to tell if salt cell is bad.
Bypassing the system’s flow switch and pump, submerge the titanium plates into a bucket of highly concentrated saltwater. Power on the cell for about one minute and observe whether a large volume of bubbles is generated. Then, safely use your hand to waft the air above the bucket toward your nose. A strong, sharp chlorine odor indicates active electrochemical reactions. No smell? You can be 100% certain the salt cell has failed. Safety Note: Never lean your face directly over the bucket to smell the gas.
Step 5: Electrochemistry Failure and Depleted MMO Coatings
At this stage, visually inspect whether the coating on the titanium plates has flaked off, exposing the raw titanium base. If this is obvious, confirm that your salt cell is dead.
The anode plates use titanium as a base material. While titanium is conductive when acting as a cathode, it is inherently non-conductive when acting as an anode (it is a “valve metal”). It relies entirely on the MMO (Mixed Metal Oxide) coating to transfer electrical current into the water. Over an average lifespan of 3 to 5 years (roughly 10,000 hours), this coating simply wears away. Once the coating is depleted, electrical resistance spikes, and hypochlorite generation drops to zero.
Sourcing Reliable Hardware for Your Pool Service Route
Once you confirm the hardware has failed, you need to procure a replacement salt cell. You can contact Century directly. As a professional manufacturer specializing in water treatment equipment, we produce premium OEM replacement salt cells. We utilize high-quality titanium substrates and employ a complex, reliable coating process to ensure that a sufficiently thick MMO layer adheres stably to the plates, guaranteeing the product reaches its design lifespan. Beyond replacement cells, Century also supplies custom-branded power supplies for pool businesses, helping you elevate your company’s authority and avoid paying exorbitant brand taxes to major labels.